Wednesday, May 16, 2018

Quick and Dirty SCCM Application Deployment Reporting

For this blog, I'm going to go over a very basic script I wrote to quickly get application deployment statuses without having to use the Configuration Manager GUI console. I find the Reporting\Deployments tab very slow to respond, and you still have to dig into each individual app if you want details.  What this function does is allow you to specify what you think is the name of the application and it will find anything like it, allow you to select the one you want, and then it will run a deployment summarization and output the results. 

Examples:
Function called with the correct name of the package
In this example, "Tanium Client" is the actual name of a software package, so it doesn't need to pop up a prompt asking us which one we actually wanted.

Function called with a keyword instead of the full package name

After package was selected from the pop up

In the above two images, I didn't remember the full name of my Tripwire deployments, so I just typed "Tripwire" and let it look for it for me.  

The Code:

This is a fairly simple piece of code, but I wrote it to run quickly.  It first checks to see if the name you gave it when running already matches a software package. If not, it runs a WMI query (much faster than using Get-CMApplication with a where-object piped on) to look for anything like what you entered. It puts all results into an array which then selects the LocalizedDisplayName and filters out duplicates. Those unique values are then handed over to Out-GridView, which thanks to the -passthru flag assigns the selected result to our original $SoftwareName variable.  You'll also see that I have to specify that I want the ".localizeddisplayname" NoteProperty. If you don't do this, you'll see the selected software name as "@LocalizedDisplayName={'Whatever your name was'}"
After that selection process, everything proceeds as normal. It gets the CMDeployment object for that application and runs the Invoke-CMDeploymentSummarization cmdlet which refreshes the deployment status, gets you current numbers, etc.  After that, I have it get the deployment again and select what I found to be the relevant values for a list formatted report.  Because SummarizationTime is done in UTC, I have it convert to client local time for ease of reporting, and I also go ahead and do a quick math expression for the percent success, which is done with the Round function so we don't get a dozen decimal places of needless precision.   The Query Time value was mostly tacked on at the end so the people I was getting this information for could see that the data was current.  

Hopefully this is useful for someone out there. Thanks for reading! 

Thursday, April 6, 2017

Domain Discovery - Finding Login Scripts

Background
     With my current contract, I'm helping a company in the process of collapsing multiple domains into one new domain while also tidying up their OU structure, Group Policy Objects, and converting old login scripts to Group Policy Preferences.  A quick query of the SYSVOL and NETLOGON folders show hundreds of login scripts, some dating back to the early 2000's.  Early on, I suspected that we weren't actually using all of them, so here's the process for discovering exactly what you need to concern yourself with. 

The Tools
    All you need to make this work is the ActiveDirectory module. Specifically, we can do almost all of this with the get-aduser command. 


This command pulls a list of all users that are Enabled and have a login script specified. This can take quite a while to run if you have a large domain, but this gives us the data set we need to get started. 


What this does is take just the ScriptPath value, convert it to uppercase (which is important later), and assign those to a new array. 


Now what we're doing is taking the $allScripts array and querying it for unique values. The ToUpper() from earlier is important here because "select -unique" is case sensitive. Had we not converted everything to uppercase, we'd get a ton more unique values because LoginScript.bat, LOGINSCRIPT.bat, and loginscript.bat would all have unique entries.  


This isn't necessary, but it lets you do a quick "does this sound right" check.  In a healthy domain, your count of unique scripts should be very small compared to your amount of users with scripts. 


This piece counts through every unique script we found and tallies up the number of users with that script applied.  From there, you have options for how you want to output it. For example:
$all | sort -property Instances -descending | ft
Will output the array, sorted from highest to lowest number of instances.  This gives you an immediate look at what your most common, and therefore most important, scripts are to migrate over. Alternatively, it can be extremely helpful to see what scripts only have one or two users assigned to them. In the case of my domain, most of those appear to be typos (i.e. LoginScirpt.bat).  
If you need to present a report to your manager, it's a nothing task to run 
$all | export-csv -notypeinformation -path C:\LoginScripts.csv
and fire that off in an email. 

I hope this has been useful. Let me know if there's anything else you'd like to see. 

Monday, March 27, 2017

WMI for Dummies

Part 1 – Basic Queries
To query WMI, you need to use the Get-WmiObject cmdlet.  An example is below:

No special formatting, filtering, output, etc.   A call to WMI like this will only query your local machine. If you’re trying to get information from a remote computer, then you need  to use the –ComputerName flag.  Be warned, that the credentials that work for your computer might be completely worthless on another machine.  If that happens, you’ll see an error like this:


You have some options when this happens, you can either open a new PowerShell window with the “RunAs” right click option and enter your credentials at that point, or you can use the –Credential flag to enter them on the fly.


That should be enough to give you a basic understanding of how to query WMI on your computer and remote machines. 

Part 2 – Filtering Results
Sometimes when you query WMI, you’ll get a ton of results back. Easy examples of that are the Win32_Product class (a list of everything in Add/Remove programs), or our example, the Win32_NetworkAdapter class.

There are three typical ways of filtering WMI results. The first is with a pipe to the where-object command, usually aliased to where or just ?
Here’s what the where command looks like in action:

The downside to using where to filter your results is that the first command will complete before the filtering is performed. This means that if you’re filtering against a giant list, that entire list has to be generated before it can even start filtering.   For things like our Win32_NetworkAdapter class, that isn’t a big deal, but if you’re filtering a few machines out of your entire SCCM SMS_R_Device database, it’s highly inefficient.  When you have giant datasets to filter against, you’re usually better off filtering the list as it’s being generated. The first example of this is the –filter flag.

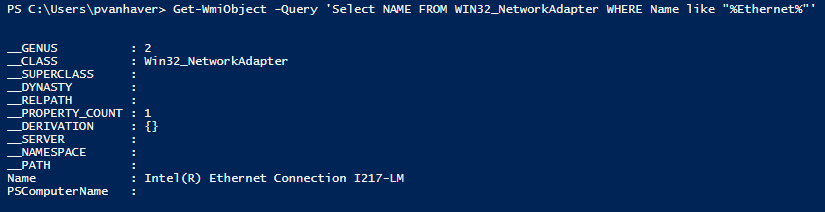
Notice that when we use the where command, the filtering is done with “-like” and the “*” symbol , while WMI filtering has no “-“ and uses “%” instead.  We can also use the –query flag to construct the entire command as a WQL query statement.

That should give you a basic idea of how to filter your WMI search results.

Part 3 – Selecting Output
Up until now, we’ve just taken our output however WMI decided to give it to us, which was usually List format.  When looking for a lot of detail about one or two specific results, List is a great format, but when you’re getting data about more than a couple items, you usually want them as a Table.   If you just want to select one data point about your results, there are three main ways of doing this. The first is to pipe your output to the select-object or select command.

Now, we just have the Name value.  You can also do your selection from within a WQL query statement.

What you’ll notice with both of those options is that there’s some header information that comes along with the value you wanted. Personally, I like to use this method of calling out one specific value:

As you can see, that just returns the value we requested with no other information coming along for the ride.

Part 4 – Formatting and Exporting
Now, we’ve done some basic formatting by only selecting values we needed, but let’s say your SCCM architect really wants a nice report to show off and has come to you about it.  For this example, let’s say he wants a list of all the network adapters on your computer that actually have physical addresses.  Here’s what that statement looks like.

That gives us our dataset to work with, but it’s unformatted.  To format it in a report-friendly way, we pipe it to the format-table command.

Note that we can use the –property flag to specify which values from the dataset we want to display. Now, if you want to export this as a CSV, you can’t just pipe your format-table command to the export-csv command.   Instead, we use the select command from earlier to pick out the values we want, and pipe that to the export-csv command.

You’ll get no output on your screen (assuming you typed it all in correctly), but when you open the CSV you created, you’ll see your data.

You may be wondering about the –notypeinformation flag. That’s to stop your CSV file from having weird header information in the first row like this:


Hopefully, that gives you some basic information to start with. WMI is one of those commands that just don't have great documentation within the Get-Help command because each class has its own quirks, values, etc.  Microsoft does have excellent documentation for each class if you have a basic understanding of how WMI works, so just go to Google® and type in the exact name of the class you're querying to see it. 
Any further questions, just let me know! 

Thursday, March 2, 2017

Distribution Point Migration Tool-Kit

The toolkit can be downloaded from my Technet Gallery HERE
This post is a long time in coming, but creating something robust enough to work in most environments that's still user friendly (with associated documentation) can take a little bit of time.  In the course of one contract I've worked, we realized that we needed a way to convert old Secondary SCCM sites into Distribution Points, but we wouldn't be given any new servers to migrate to. We also knew that the WAN links connecting these remote sites back to our headquarters were severely lacking.  Our solution was to prestage all the content currently stored on the content libraries so we could strip off all the roles (which would clear the SCCM content library), remove unneeded programs and features, add the servers back as Distribution Points, and then reload the prestaged content so it wouldn't have to transfer over our unspeakably slow WAN connection. We got a peek at this work with my last post of the SCCM Universal Prestage script, but this post will give you the other pieces of the puzzle.  

The Core Functions


Initialize-Toolkit
                This is the first function you call if you’re running the Migration Kit from a PowerShell window you didn’t summon up from inside the Configuration Manager console.  This function will verify that you have Administrator rights, will seek out and import the Configuration Manager module, and will map your CMSite PSDrive if you don’t already have it mapped. This function is also called within every other function after a quick check to make sure that the CMSite drive is mapped.  If it isn't mapped, it calls the Initialize-Toolkit function and maps it. 
 Console run without admin rights
Console run without admin rights

After the drive has been created

Get-DPContent
                The second function in the toolkit will query our primary site server and return a list of all content that is assigned to the distribution point we provided.  There are multiple ways to get this information. I’ve seen it done with Get-CMDeploymentPackage cmdlet since that will also return package type information that we’ll need later.   However, I chose to do it via the SMS_DPContentInfo WMI class because I find that it returns the same level of information, but does so in roughly 1/3 the time.  It also means that you can run the command without needing to be connected to the CMSite drive if you don’t want to fully initialize everything. 
 A simple report of package ID's and names

An example of the data stored by SMS_DPContentInfo
Prestage-Content
                This is one of the ‘heavy lifters’ of the toolkit.  This function requires a package ID number, the Distribution Point containing the package, and the folder you want it dumped to after creation. What this creates is a PKGX file named with the package ID of whatever you prestaged.  The way it decides what to prestage is based on the PackageType value that comes from WMI’s SMS_PackageBaseClass. Again, you can get a package type identifier from Get-CMDeploymentPackage if you’d rather go that way, but I like WMI.  Once it’s pulled the PackageType value, it runs it through a SWITCH command and runs the appropriate Publish-CMPrestageContent command.  I don’t do any special logging with this function since Publish-CMPrestageContent already does a good job of it.
 Prestaging a single file

Prestaging multiple packages with a For Loop

Restage-Content
                This function is one of the main reasons I like to save my prestage files with the PackageID as the name.  You input the folder containing the prestage files as well as the name of the Distribution Point they need to be assigned to, and this will get the package type information for that package, run the same switch as Prestage-Content, and issue the Start-CMContentDistribution command with the appropriate flags.  Just to save time, it will also query the Get-DPContent function to make sure that it isn’t trying to reassign packages that are already assigned.
Packages were already assigned in SCCM

 Package distribution in progress

Extract-Content
                This function calls upon Microsoft’s ExtractContent.exe tool to run, and is designed to be run locally from whatever DP you’re importing the package to.  The only flag you need to specify is the location of the prestaged content folder.  It takes the hostname of the computer it’s running from and makes a WMI query to see any packages assigned to it that aren’t in State 0.  If the package shows as state 0, then there’s no further work to be done, and we can just work on the others.  There are multiple ways you can run the extractcontent.exe tool, but I’ve found some to work better than others.   Whether you run it specifying a single package to extract or you run it with an entire folder targeted, I’ve found that when I check the Distribution Point Configuration Status in the SCCM console, there’s always some that still show “waiting for prestage content.”  In almost every case where that’s happened, just re-prestaging the content cleared it up. I don’t know if this is a limitation of the extractcontent.exe tool, my impatience, or what, but it works for me.  Because of that, I actually have my Extract-Content function run through the Prestage content folder one item at a time, so you can re-run the function, it will re-query for unsuccessful packages, and only attempt to extract the packages that didn’t make it the first time.
 
ExtractContent running

Example

Stage-LocalDPContent
                I put this together for our SCCM architect who wanted something that he could quickly and easily run while logged into our Secondary Site Server that was being migrated.  What this does is query the local DP for all assigned content, export it with the Prestage-Content function, and give you a progress bar to show you how far along you are. 

Thursday, February 23, 2017

Universal SCCM Content Prestager

PS1 file can be found at my TechNet gallery: HERE

The Use Case
    Prestaging content is a fact of life in the SCCM world.  Whether you're standing up a new site, cloning a DP, or sending packages to a site with really bad bandwidth, there are a variety of reasons you need to create prestage packages.  At multiple contracts I worked, these packages were created by finding the content in the Configuration Manager GUI, right clicking, selecting Create Prestage Content File, and going through the wizard.  While this is technically a correct way to do things, it's cumbersome, requires you to remember where everything is in the menu structure, and ties up your console while you do packages one at a time.   I could see using this method for one or two packages every now and then, but you're on a PowerShell blog. Here, we're all about scale. 

Not pictured: efficiency


Making it happen
     The Configuration Manager module actually comes with a prestage cmdlet built right in, but this cmdlet is one of the most poorly written ones in all of PowerShell.  It has no real intelligence of its own, requiring you to spell out exactly what package type you want to back up. Since every package has a unique PackageID value, I never understood why they didn't just make it use that number and get on with life, but they didn't.  Feel free to download the script and follow along.
I actually couldn't fit them all on one screen


The Script
     The first thing we need to do is declare our variables. This script needs to know what the package ID number is (which can be found literally everywhere the package is mentioned in the SCCM console or WMI interface),  what DP we're pulling the content from, and where the file needs to be saved. All of these are mandatory, so you'll be prompted for them if you don't put them inline.  Also, depending on the prestage location, you'll need admin rights to move files there, so we just check for those at the outset.  We'll also make sure you're connected to your CMSite PSDrive. I also have the script make sure the package isn't already there.  Something else to keep in mind is that the DP name needs to be a FQDN when the command runs. If you enter it with just the hostname, the script will sort that out for you, so no worries.


     After all the pre-reqs have checked out, the real logic comes in. The first thing it does is try to run get-cmpackge with the package ID, if that comes back as $NULL, meaning there was no package with that ID, it starts down the list of available content types. It checks if it's a software update package, application, boot image, OS image, or driver package.  Until it finds something that actually returns an object, it'll keep checking. Then, it makes a mental note of what it found so we can use it later.  For troubleshooting and debugging reasons, I like to output the name of the package as well as its source path, but this isn't necessary. It will also tell you where it's going and what it will be named.  Then, we use a Switch  statement with the count variable (our mental note from earlier) to select the correct Publish-CMPrestageContent flags that actually do the prestaging work for us.

Figuring out what you wanted


Actually prestaging it


Actually Using It
     On its own, it's a nice function to have loaded in my shell. Being able to generate a prestage file without tying up my GUI is always handy, and depending on the organizational skills of the previous SCCM admins, not having to dig around to find a package in their menus can be a real time saver.  Where this script comes into its own, however, is when it's chained together with other commands, which is what we'll discuss in our next post. 

Tuesday, February 21, 2017

2-21-2017 - Working with CSV Files


Hey everyone, it's been a little while since my last post, but work's been busy.  A recurring issue I see on TechNet is that plenty of people have trouble working with importing/exporting CSV files.  Specifically, I see questions about how to modify CSV files. Personally, I don't see any value in modifying the CSV file directly, but rather importing the data from said file and working with the dataset natively in PowerShell.  Using one person's thread as an example, he had a CSV file full of IP addresses that corresponded to his VM's.  He wanted to add data about the VM based on the IP address, but wanted to know how to "modify the line" in the CSV file.    He had already written part of the script to create the CSV by pinging each computer in his IP range and outputting that to CSV.  For our test, here's what our CSV looks like:
Now, let's say we want to find the hostnames for each of these computers and add that to a new column. There are a couple ways we could do this, but in an enterprise environment, a good way to do it is to just ask AD who it is.   First, we create the empty "column" for our Hostname value.


Once that's created, we need to fill it with values:


Keep in mind that you will see a lot of red text for any computer that doesn't have an entry in AD. This could be a printer, a switch, etc.  If you're using Windows 8.1+ or Server 2012R2+, you can use the resolve-dnsname cmdlet. 

You can add more columns to the CSV by using the Add-Member cmdlet to your heart's content, and when you're done, you pipe your $dataset variable back to the export-csv cmdlet.   

Really, once you start looking at CSV files as arrays of custom objects, they're pretty easy to work with.

Friday, February 10, 2017

2-10-2017: Importing drivers into SCCM in bulk

This is taken from my TechNet gallery here: https://goo.gl/n1QT89

     When you're tasked with something like a Windows 10 upgrade, you'll find yourself spending lots of time downloading and importing drivers into SCCM.   While this script won't go out and download them for you (like the Dell and HP Driver Import tools I've seen out there), it manufacturer, model, and architecture agnostic, you don't get caught up trying to negotiate your way past your firewall and proxy teams, and it runs in a bit under 50 lines of code (including comments). Rather than pasting in the entire thing, I'll do a screenshot and walk through from there.

     For this script to work, there's some groundwork required on your part. When you download the drivers, they need to be downloaded into a folder that has whatever name you want for your driver package later.  If you're like me, you're already doing this as you download. If I need drivers for an HP Z230 desktop, the folder they're saved in is already called "HP Z230 Windows 10 x64" or something similar so I can find them later.  The way this script works, whatever your folders' names are is what names your driver packages will end up with.
    Aside from that, all you need to do is plug in the path to the file share that has all your make/model folders in the root, as well as the location where you want to store your driver packages.
    Something you will notice in this script is that I bounce between my C:\ drive and my SCCM drive. This is because UNC paths don't always work as expected when you're on the SCCM drive, and SCCM cmdlets don't play nice running from anything other than the SCCM drive.  To guarantee they both work when needed, I just switch between locations, and it's no big deal. 
    This script can take a little while to run, but it will give you feedback as it goes, and it doesn't lock you out of the SCCM GUI while it runs.